This page outlines some of the modifications I made to my Camaro
- First Replacement Head Unit – Kenwood KVC-1000 Motorised Head Unit
- PC
- PS2
- FM Modulator
- Eonon Head Unit
- Mstation MP3 Player
- Sub
- AV Switcher
- Invertor
- Sat Nav
- Door Speakers
Kenwood KVC-1000 Head Unit
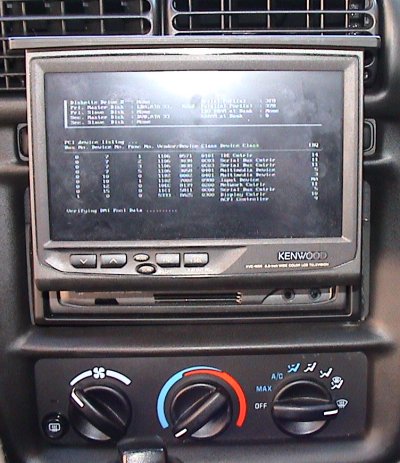
I Wanted to replace the factory stereo with one that would allow me to plug the MP3 player into it using RCA connects as opposed to using the FM modulator. Looking around at the time there wasn’t a lot of choice and it looked like I needed to pay about 350 quid for a unit to do this. As a nice to have I though I would price up the entry level head units with pop out screens and found that there wasn’t a huge difference in price. Having a screen in the car would be cool and give some more options in the future. I didn’t think I would end up watching movies on there too much as I am never in the car stationary long enough to watch a whole movie but having a screen was just too good to pass up. I could hook a PC up to it, the MP3 player, PS2 and in the future a navigation system. In the end I did go for one a bit more than the entry level system as I wanted a fully motorised screen with touch screen and built in TV tuner as the base system. I brought a package that consisted of the KVC-1000 and the KTC-1000R. The KVC is the head unit with motorised screen and TV tuner and the KTC is the amp and Radio.
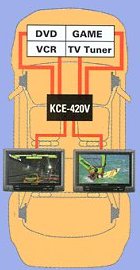
Initially I decided I wanted to attach the MP3 player, a PS2 and a PC to the TV screen.
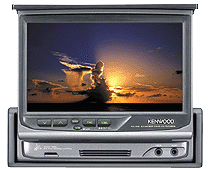
This is the screen that I went for. Its a single DIN slot headunit with a screen that retracts inside the unit leaving what looks like a blank panel when it is closed.
Main features KVC-1000
- MASK with MASK key Lock System
- 6.5″ Wide colour TFT Active Matrix Display
- Full motorised mechanism
- Graphical user interface with Touch Screen control
- Built-in active speaker
- Supplied with remote control unit
- PLL Synthesized TV tuner (PAL B/G/I and Secam L/D/K/B/G)
- TV1 / TV2 12 presets
- Auto memory entry
- Auto seek
- Direct access tuning with remote
- SNPS (Station Name Presets)
- Supplied with TV antenna
- Front AV input
- Rear AV input / output (switchable)
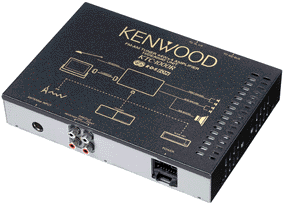
KTC-1000R:
Auto Dimmer, 2-Way Telephone Mute, Digital Clock (12 Hour), Maximum Output Power: 40W x 4, System E’s, 2 Preouts (4 Volt), Separate Bass/Treble Control, Source Memory Tone, Loudness Control, CD Changer Control, 24 Station Presets, Intelligent Clear Reception, AME (Automatic Memory Entry), Local Seek, Direct Access Tuning With Remote.
Instructions for KTC-1000R Instructions for KVC-1000
Installation
I originally intended to get this installed professionally but after calling around and getting a few negative responses, bit busy at the moment, not sure how much that is going to cost as its and American car, might be difficulties etc, and also because I fancied the challenge I decided to have a go myself. The difficult bits I thought was going to be wiring it up, fitting it into the car as the original was a double din unit and getting it to work with the steering wheel controls.
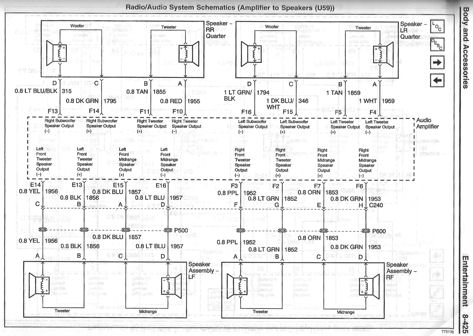
I tried as hard as I could to get a wiring harness for the car but I couldn’t get one in the UK and a few people I approached in the US would supply to the UK. I found a wiring diagram for my car on the net, without this I wouldn’t have even bothered trying.
| P O W E R | O E M C O L O R | S T A N D A R D |
| Battery / Memory | Orange | Yellow |
| Ignition / Accessory | Yellow | Red |
| Ground | Black | Black |
| Power Antenna | Pink | Blue |
| Amplifier Turn On | N/A | Blue / White |
| Illumination | Gray | Orange |
| Dimmer | N/A | Orange / White |
| S P E A K E R S | O E M C O L O R | S T A N D A R D |
| Front / Right + | Light Green | Gray |
| Front / Right – | Dark Green | Gray / Black |
| Front / Left + | Tan | White |
| Front / Left – | Gray | White / Black |
| Rear / Right + | Dark Blue | Purple |
| Rear / Right – | Light Blue | Purple / Black |
| Rear / Left + | Brown | Green |
| Rear / Left – | Yellow | Green / Black |
I decided there was no point in trying to save the connector so I cut the wires off and made new connections to attach them direct to the car stereo. I started with the screen unit first. I just wanted to get power to it initially. I hooked up the battery, ignition and ground cables to the head unit using the original wires. I tried to power the unit up but it wouldn’t power up, after reading the instructions I realised that there was a master switch cable and a safety feature that wouldn’t let you operate it unless it detected the handbrake was on. I didn’t know how to get to the handbrake indicator cable and I didn’t want that restriction anyway so I just hooked up the Handbrake detection cable to the ground. If you haven’t plugged the amplifier unit in yet the master switch cable also has to be connected to the ground for the thing to work.
It wouldn’t do much at this stage just eject the screen. To test it out I hooked up a DVD player with composite out and after changing the menus to accept a video source instead of a navigation signal I got a picture. I was well impressed that I had got this far. The thing was all in bits just lying on the seat for now but it was a good start.
Next came the amplifier. Again I just wanted to see if the thing worked for now so I hooked up all the power cables and connected it to the head unit and then plugged the antenna cable in. I also remembered to pull the master switch cable from the ground connector. I hadn’t hooked up any speakers at this time but the head unit had detected that I now had a radio and added an option on the screen for it and it did find a few stations so I was happy with that.
TV
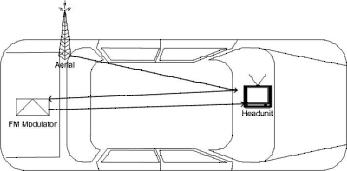
TV was next. You get two aerials with the kit and reading the instructions they recommend that you stick them on the back window. With this car being a soft-top that wasn’t practical so I thought I would hide them in the boot. Where I live is pants for TV reception anyway so wasn’t bothered when I didn’t get a picture. I just took off down the motorway but I wasn’t impressed with the reception quality that I got. I found some areas that were pretty good but most of the time it was poor. A took the car to a local car audio shop Sextons and they had a look and a chat and they recommended that I move the aerials to the front windscreen which I did and now the picture is great. The aerials don’t look bad on the front as I have hidden the cables and the antenna in the coverings along the side and top of the windscreen so all you can see is the little box stuck in each top corner of the windscreen. Picture quality jumps around a bit if you are driving but if you are stationary and in a decent area its spot on.
Speakers
Speakers were easy using the wiring chart above. All the speakers were labelled on my unit so I just the colour codes to work out which wires were the speaker wires for my car and connected them together. Tested out the MP3 player and loved it. The sound quality was excellent. So much better than through the FM Tuner.
I then just hooked up the rest of the wires that were left these included
Dimmer. Again I was able to use the wiring chart to figure which cable this was although I did test it using a voltmeter and turning the lights on. When this cable is connected and you turn your lights on it dims the screen for night viewing.
Power Aerial. Just matched up the wires using the wiring chart and powered the unit on and the aerial popped up.
Radio
Now I had some speakers I could test the radio out. I got a bit of a signal but the reception didn’t seem very good. I though it was down to my hacked Ariel connection that I had to do because of the MP3 player mentioned earlier. After re-doing the connection a couple of times I still couldn’t get a good signal. I even tried moving everything around in case I was getting interference from something but nothing changed. I finally decided to try and switch the MP3 player off, It had powered up when I turned the ignition on, and the interference went away. I’m still not sure why the MP3 player interferes as the cables are run well away from the ariel but its no great loss as I can’t listen to both at the same time anyway. The only thing it does effect is that when I am listening to MP3s I don’t have a good signal for any Radio Traffic Information that may be being broadcast.
I also plugged the DVD player back in this time with some sound and was well impressed with not only the picture but the sound. I got a lot more surround effects than what I had expected and the bass was excellent with the whole car rumbling.
Fitting
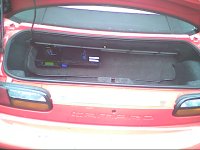
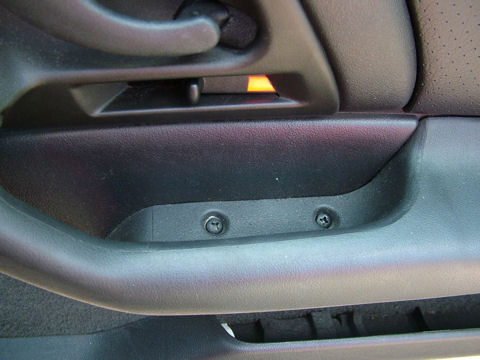
Now I was happy that everything was working I started to think about how I could put it into the double din slot and make it look neat. There was no easy way I was able to secure the unit that I had got to the cage inside the car. There was also an eye at the back of the cage where the old head unit used to have a point that slotted into it to help you line it all up. My new head unit wouldn’t fit with this eye in place so I had to hacksaw it off. I decided to build a wooden frame that fitted around the head unit. The frame would have a bottom and two sides to it. It would be big enough to stop the unit sliding back into the car and also hold it in place from moving left and right. I attached a stopper to the bottom of it to stop the thing from being pulled out as well. This has worked quite well. Its not completely secure, if you want to get the unit out you can do so by lifting it up and pulling it out, but it works for me.
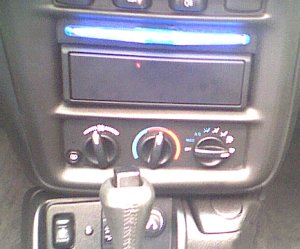
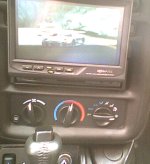
I decided to place the amplifier on top of the head unit as it was easy as I wouldn’t have to run wires very far and there was space for it without trying to fit it somewhere else. Sextons did advise me against this saying I would have interference problems but with some testing moving the units together and apart I didn’t see any problems so I went for it. The only thing left to do was to blank off the top half of the double din slot. Actually it was more like a third as my frame lifts the head unit up a bit. I used some plywood for this and painted it black. I secured it in place with some bolts that were used to attached the original head unit to the car so to get the head unit out you do have to unbolt this plate or break the wood so did add a bit more security. I have also added a neon light to the blanking plate as you can see that can be turned on if needed if the car is parked up. You can see the final result in the picture. The TV screen is retracted and the all you can see is the making plate.

This is a pic of the screen and you can just make out Gran Turismo playing
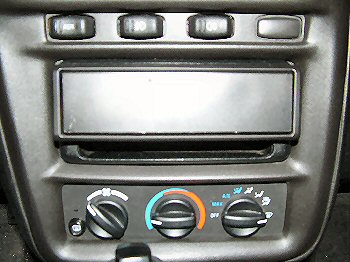
Since writing this I made a trip to the states and manage to get a proper single din adapter for the car. This has allowed me to secure everything in place a lot better and it looks a lot more professionally done. The blue neon has gone now as it just looked gimmicky.
PC
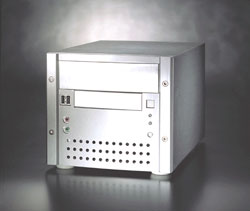
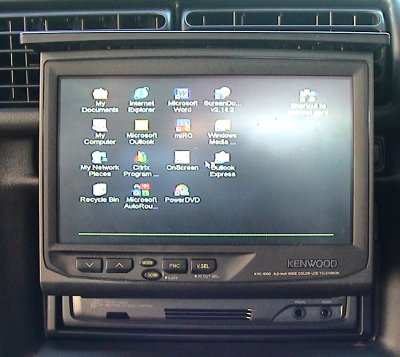
Initially I didn’t have a PC permanently in the car. Again this is a money thing as I want a really small PC I am looking at around £600 for one. To do my testing I used a full height one in the boot. I loaded Windows ME on it and put an ATI all in wonder video card in it to give me composite out. I configured a desktop for 640 x 480 so I could read it on the small screen and made the background black and the icons massive and used large fonts etc. I also cleaned up the icons so I just had my computer, Power DVD and windows Media player. To start with I brought a very small trackball that you use like a gun. This thing sits on your finger and u roll a ball with your thumb and click with your finger. Works great. The inverter powers the PC so had to go to the bootto turn it on and the PC and jumped back in the car to watch ME boot on my car screen. Once the thing booted it worked like a PC so I don’t need to bore you with that suffice to say that I could watch all the movies I had loaded on the hard disk, play mp3s, use Word and was very pleased with the results.
I managed to get a PC for the car. Not the smallest one I had seen but the best price / size combination. I got it from www.spacewalker.co.uk I went for the 370PGA motherboard version as it was only 200 quid. The good thing about this box is it comes with (almost) everything that you want its got built in TV out :), USB, Firewire, Network Card and sound and the usual keyboard, mouse, serial, parallel ports. It has got 1 pci slot should you need anything else. I slapped in an 800mhz Celeron and 256mb of Ram DVD drive and an 80gb Hardn disk to finish it off.
It takes its power from the inverter, and the tv out audio out go straight to the AV switcher. I went for ME as at the time I couldn’t find any XP drivers for the onboard card to get TV out. I did since find some but could never be arsed to rebuild it at as it was working ok.
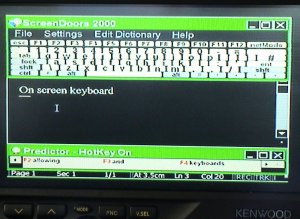
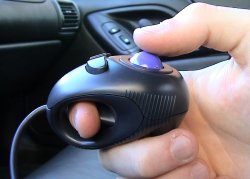
I had to do a lot of playing with the settings to get things readable, use high contrast colours, increase the DPI etc. Composite is never going to give u a crisp picture for desktop work, but as my monitor in the car doesn’t take SVHS I’m going to have to live with it. I have also had to spend time configuring the applications to make them more readable again doing things like increasing font sizes and selecting sensible colours. As of yet I haven’t used a keyboard with it. I have been looking for a really small radio one but not found one. I have been using an onscreen keyboard. There are loads out there and even one that comes with XP. I have gone for one called Onscreen as you can resize the keyboard. The PC doesn’t moan if a keyboard isn’t plugged in so I just leave the mouse in all the time. I looked at Radio mice as well, the presentation sort but they were a lot of money where as this little thing does the job great, its easy to control and was very cheap. Just use your thumb to steer in pull the trigger for a left mouse click.
Here is a list of Apps that I have on there and what I am using them for and also a few comments about how usable the app is so far.
Mirc
IRC 🙂 I have probably used this the most so far, its good to talk 🙂 and I have set this up so it logs straight in to #ixuk on quakenet where I sit most of the time. After a bit of playing this is very useable and with GPRS (more later) very cheap.
Outlook
Email.. I have set it up with POP 3 access to [email protected]. This is a separate account I use for my phone and the car so it doesn’t fill up with junk email. I might also set up IMAP 4 to my email account if I do need to ever access it.
Windows Media Player
Movies. Filling the hard disk up with them. Not using it for Mp3s as I don’t need it with the mstation
MSN Messenger
Made the fonts bigger, but works well
PowerDVD
For the movies that WMP don’t like or if I want to play a DVD.
Office XP
Only used Word so far which is useable to knock up a basic document.
Citrix
Not tried it yet but the idea is to be able to access my machines at home and also Work
Internet Explorer
Not had much chance to use it yet and mixed results with the readability.
Getting Online
To get on line I have been using my T68i Mobile. At the moment I have a data cable that goes to the back seat and I plug the phone into that. Its GPRS enabled so I can get up to a 44kbs connection. I have ordered a Bluetooth USB add on for the PC. If it works ok then I will be able to have the phone anywhere in the car and dial up onto the internet without the trailing wire. GPRS is not only quicker than GSM but you are charged for the amount of data that you transfer rather than the time online. As most of this is geared around text it has proven to be quite cheap using IRC, MSN and email, even the Internet with the pics turned off is ok.
PS2
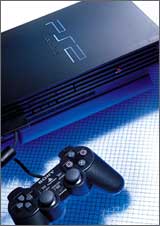
Not much to say on this one that isn’t covered in the other sections. The invertor provided the power. The AV switcher was already in the boot for the audio and video connections.
I also use the PS2 as a DVD player. I did want to use the PS2 in the house as well so I have attached it to the car using Velcro strips attached to the bottom of the ps2 and to the position in the boot of the car and so far it has held it solidly in place. If I want it out of the car I just pick it up and then in the morning place it back on the Velcro. I leave the power cable video cables in the car as well and have brought extra ones in the house so all I have to move back and forwards is the PS2 itself.
Initially I started with a wired controller and just pulled it from the back when I wanted to use it but as Wireless controllers dropped in price and availability I moved to them and just kept the controller in the glove box.
 |  | |
| Here you can see the PS2 and the MP3 player side by side in the top boot shelf. | This is a pic of the screen and you can just make out Gran Turismo playing |
FM Modulator
This thing needs a bit of an explanation. Because at the time most car stereos don’t have any RCA inputs you need some way of getting an extra device to run on them. Most people have seen the cassette adapters you get, these were popular for adding a CD walkman to your car when they first came out. The FM modulator lets you convert the sound output from the device into a radio frequency then you just tune your radio in and listen to it that way. There are some add ons around for IPODS at the moment that do this wirelessly but at the time.. this solution was a wired solution.
For this to work you plug the FM modulator into the M-Station’s phono connections and run two cables from it to the car stereo. You unplug your antenna connector from your car stereo and plug it into one of these wires and then plug the other wire back into your car stereo. So what you end up with is the original wire that comes from your car aerial down to the front of your car, this then goes into the FM modulator adapter, back down to the FM modulator and then from the FM modulator back into the car stereo.
If you can access your aerial easily then you obviously don’t have to take the cable all the way down to come back again just run it direct from the aerial to the FM modulator and then down to the headunit.
This configuration lets you listen to the radio or if you turn on your MP3 player you can also tune your radio into the MP3 player. A couple of extra things to know.
- You can tune the FM modulator to 3 different frequencies in case of local interference
- You can’t listen to the radio when the M-Station is turned on
The only problem I had was that the antenna connection in my car was a US one which is thinner than one we use here in the UK and the m-station fm leads come with a female and male connection in UK size. I just had to cut the ends off and swap them around a bit to get it to work.
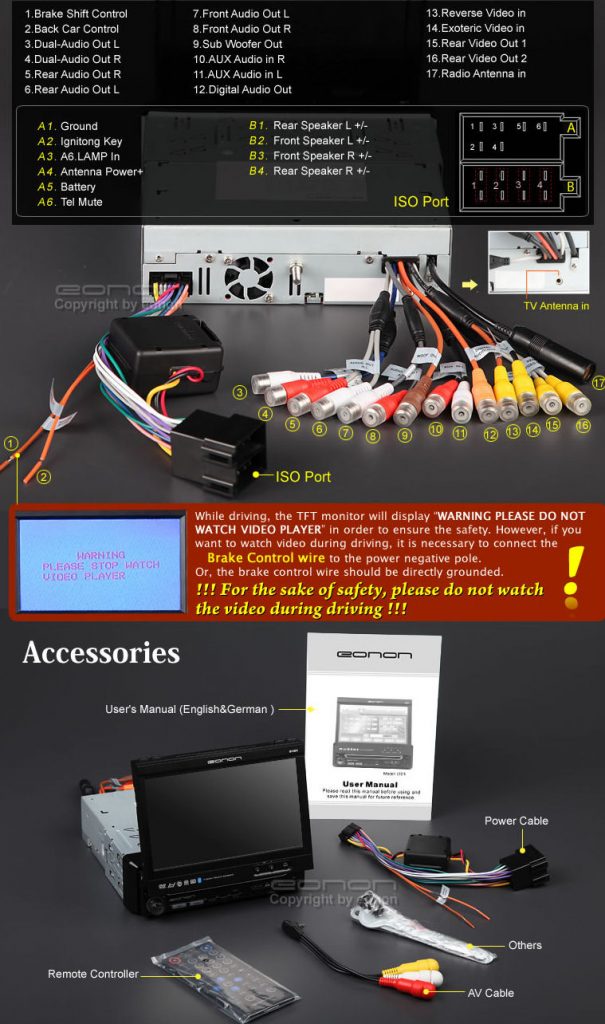
| Eonon Head Unit The Kenwood head unit died. As I don’t use the camaro as much as I used to due me using the buggy quite a bit I didnt want to spend a lot of money on a replacement.The Camaro is a 1.5 din slot but I had the 1 din adapater from the previous head unit. I wanted something with video inputs and audio inputs and had outputs for the sub. Some form of TV screen for the reversing camera and xbox was required as well. After a fair bit of looking around I went for an ebay special and plucked for the well know brand of eonon, pronounced e-on-on 😐 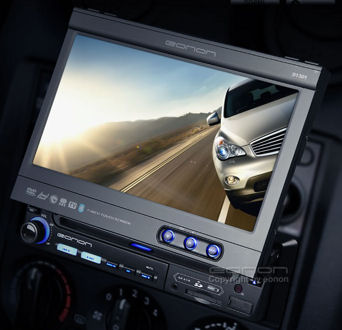 The model D1301 is a single DIN 7″ motorised screen which looks like it’s based on Windows CE. There are quire a few different types but this was one of the cheaper ones.You get what you pay for. The Kenwood was 9 years old and was looking dated but still sounded better than this eonon and the kenwood had greater control over the audio with the ability to stop the bass from going to the speakers and just sending it the sub.The interface on the Eonon is a little clunky but it does work. It’s got the added benefit of the DVD player but the thing I have been using the most is the SD card. I have put movies, pictures and MP3s. Bluetooth functionality works on it and I have used it instead of the other bluetooth handsfree kit I have as the sound through the speakers is nice and loud and has the ability to remember phone numbers that you have called or who have called you. The ability to stream music through bluetooth is quite a neat feature as well and you can use your mobile as a remote device up to about 10 meters away from the car and stream music from your phone. Full Specs7 Inch Motorized Touch Screen AVI/DVD/MP3/VCD/CD Player TV Tuner Radio (AM/FM) Tuner Built-In USB Port /SD Slot Support Bluetooth Function / Dual Zone FunctionSpecifices-ISO 1 DIN Size -Screen Size: 7 Inch -Resolution: 480*RGB*234 -Touch Screen Function -Fully Motorized Viewing Angle Adjustment –Drop Down Detachable Front Panel -Built-in Microphone in the control panel –Support Bluetooth MP3 Player Function (Attention: This function can be only used with the mobile phone which supports the Bluetooth Audio Output) –Built-In USB Port/SD Slot (USB Port: Can support soft drive such as USB flash drive, or MP3 player with maximum 8G compatibility, Can’t support portable hard drive. SD Card Port: Can support SD Card of maximum 8G compatibility ) –In USB/SD mode, you can touch the name of song to play the song-Dual Zone Function: Dual Zone function can be realized in same unit: Driver can enjoy Radio with car speakers in front zone; while passengers can be enjoy DVD movies by through rear AV output of unit.-The Latest 3D User Interface -In any mode, you can adjust screen brightness – Built-In Analog Television -TV system: PAL/NTSC -Built in amplifier FR/FL/RR/RL 4-Channel Audio Output -4×65W Surround Stereo -Image Brightness /Contrast/ Color /Saturation adjustable -Effect Compensation: POP ROCK CLASS -Compatible Format: AVI/DVD/DVD+R/DVD-R/DVD-RW/VCD/MP3/CD/CD-RW/JPEG -DVD OSD Language: English /German/Spanish/French/Portuguese/Italian/ -1*Radio Antenna Input -1*TV Antenna Input -1*AUX Video/Audio In Port -RCA Video 1 Output/Video 2 Output/Back Sight Video Input /AUX Video 1 input -RCA Audio FR/FL/RR/RL /Sub woofer output and AUX Audio R/L Input Dual Audio R/L Output Digital Audio Output -Built-in Radio Tuner (30 Preset Stations) -FM(3*6)87.5-108MHz(Europe), Increment 0.05MHz -AM(2*6)522-1620KHz, Increment: 9 KHz -In Radio mode, can select Europe/ USA /Asia /OIRT /M-East /Latin radio frequency -Built-In RDS Radio Receiver Function -Built-In LCD Clock Display Function -Built-In Cooling Fan -Auto-memory Function -Power Supply: DC 12V -Max Working Current: 10A -Gross Weight: 3.5kg -Net Weight: 2.6kg -Install Size:185(L)×160(W)×50(H)mm I didn’t take any pics during the install. The install was a lot easier that the kenwood as everything is built into the head unit. I took the opportunity to fit a standard ISO connection as well to the car so its easier to unplug the head unit now if I ever needed to.This reference table still came in handy. |
| P O W E R | O E M C O L O R | S T A N D A R D |
| Battery / Memory | Orange | Yellow |
| Ignition / Accessory | Yellow | Red |
| Ground | Black | Black |
| Power Antenna | Pink | Blue |
| Amplifier Turn On | N/A | Blue / White |
| Illumination | Gray | Orange |
| Dimmer | N/A | Orange / White |
| S P E A K E R S | O E M C O L O R | S T A N D A R D |
| Front / Right + | Light Green | Gray |
| Front / Right – | Dark Green | Gray / Black |
| Front / Left + | Tan | White |
| Front / Left – | Gray | White / Black |
| Rear / Right + | Dark Blue | Purple |
| Rear / Right – | Light Blue | Purple / Black |
| Rear / Left + | Brown | Green |
| Rear / Left – | Yellow | Green / Black |
MSTATION
I know its all a bit bulky now and you can get head units with this stuff built in but at the time (2001) this thing was the daddy. It was the first thing that I wanted to put in there. I saw one of these on the web before I got the car and as I have a lot of MP3 based music and spend a lot of time on the road knew I needed one of these.
Basically this is a Hard disk MP3 based system. You get a standard PC hard disk in a portable metal box and two cadies for it. One caddy goes in your PC and the other in your car. You stick the hard disk in your pc and when you boot it up you see it as another hard disk. Drag and drop your MP3 files onto the hard disk. Shut your PC down. Take the hard disk and put it in the car caddy and you can now play all those mp3s on your car stereo. 🙂
First thing was to buy it. The M-Station came with a 10GB hard disk as standard. I got them to fit a 40GB in mine and have since upgraded it to an 80gb hard disk.
So I paid my money and this lot arrived in the post.
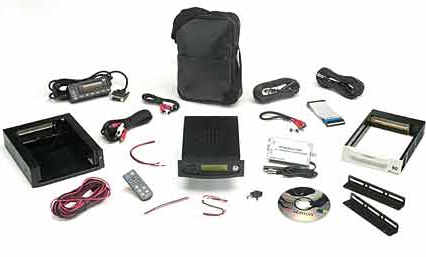
- The M-Station hard disk
- Computer docking Frame
- Car docking frame
- Wired remote control
- IR remote control
- FM modulator
- All cables required inc phono leads, FM leads, power cables etc.
- Software and drivers for PC
- Travel Bag
The first decision was where to put the thing. I tried for ages to get it inside the car but just couldn’t figure on anywhere sensible for it to go so I had to settle for the boot. I had the factory fitted car stereo at that time and it didn’t have any RCA inputs so initially I had to use the FM modulator that came with the kit. So what I needed in the boot was
- Car docking station
- Ignition Power
- Ground
- Wired Remote Control Connector
- FM Modulator
I got a friend to help out and it was a good thing that I did as it was a bit of a pain to do and I don’t think I would have had the courage to pull apart as much of the car with it being new as I did without him.
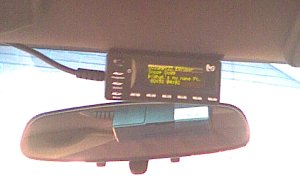
We ran a power cable from the ignition cable that went into the back of the car stereo to the boot and made a new ground cable in the boot. We also threaded the wired remote to the front of the car as well and just left it loose for now. The wired remote is the big LCD interface that lets shows you whats playing and lets you choose the tracks.
LCD Interface
With the power cables in place and the wired remote connected up it was time to power this thing up and see if it worked. I found its best to leave the power on the M-Station hard disk off that way you can turn it on and off from the wired remote. This confused me at first as when I put the hard disk in the car the first few times I kept pressing the power button on and couldn’t work out why I couldn’t turn the thing off from the remote. When it first powers up after being in your PC it has to index all the mp3s. This can take up to 10 mins for a full 80GB disk. Thankfully it only has to do it the once.
Powering up the mp3 unit kicks in the FM modulator so just tune your stereo into the frequency you set the modulator too and listen to your mp3s. Now I have the new head unit that takes RCA inputs I have done away with the FM modulator so that the sound goes direct to the head unit and gives a lot cleaner sound.
Playback works in a number of ways. You can either navigate to a single song and play that.. then it will play the next one in the list and so on. You can build playlists, .m3u files, up on your PC using something like Winamp and the M-Station will support them. The way I tend to use it the most is on directory playback. I tend to keep my new stuff in a separate directory. If you hold down the play button on a directory then it builds a playlist of all the songs in that directory then just press the random button and enjoy.
Again I had problems trying to decide where to put the remote LCD, in the end I ended up putting it just above the rear view mirror, which works really well as I don’t have to take my eyes off the road. If its a bright day it is hard to see though as the contrast levels on the LCD screen aren’t too great.
Other Stuff
Thats about it. I am well pleased with it (still going strong after 4 years so far). To have all that music in the car is awesome. So much better that messing with CDs. It doesn’t have to be just music , I spend a lot of time in the car and there are some good audio stories out there both fictional and some really funny stuff as well.
Oh yeah.. there is some hard limit as to how many songs you can have in a playlist. I think it is just over 1000. I didn’t realise this at first and it did cause me a problem. I originally sorted my music into directories by artist and I split the alphabet up into four folders A-F, G-M etc.. initially I was tending to pick one of these directories and build a playlist from them and just listen to music at random. With the 1000 songs limit that I didn’t know about I was missing a lot of tracks in that directory from my playlist. I have since sub divided directories by artists to get round the problem.
There are also docking bays for your home stereo for this thing as well if you wanted to you can unplug it from the car come into the house and plug it into your stereo in the home.
It displays the artist and track name during playback if an ID3 is available. If a ID3 tag is not available it will display the file name of the mp3. It will play mp3 files all the way up to 320kbps.
Here you can see the PS2 and the MP3 player side by side in the top boot shelf.

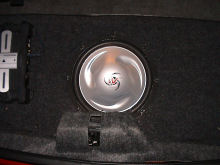
Sub
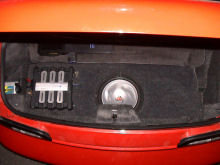
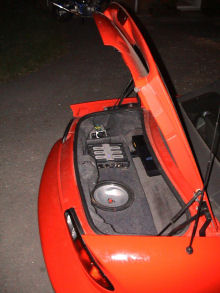
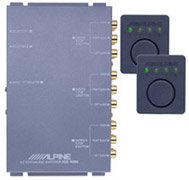
| AV Switch I had run 3 RCA cables from the head unit. Two for audio and one for composite video. Initially I knew you could get electronic switching devices but these seemed to be £150 and I had just spent all my money on the head unit. To save a bit of money in the early stages I used an old manual AV switch I had. This box allows for 3 inputs and to switch between them you have to press a button on the box itself. I had it shoved under my seat at the start and had the PS2, MP3 player and PC all going into it.Eventually got enough money together to do it how I wanted. I went for an Alpine KCE-420V shown on the left. It seemed a reasonable price. For £140 quid I get 4 inputs and two outputs with a fly lead remote, that’s the little black thing with the round button to the left. Every time you press it it changes AV channel. Its been well worth getting as its a lot neater solution. I have put this in the boot so all I need is the one AV lead going to front of the car to plug into the tv screen and also the fly remote so I can change channels. The thing had to be powered as well which I hadn’t really thought about when I ordered it. As it was in the boot I just too some spurs of the connections already in place for the MP3 player. |
  |
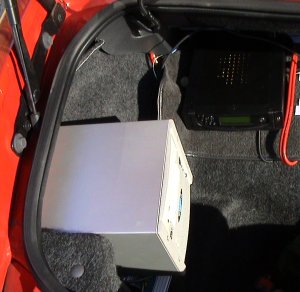
Inverter
240 Volts
Up to now I had been testing the DVD player and ps2 with the mains but I needed something that would give me 240 volts from from the car battery. You can purchase a power inverter to do this from most car audio / accessory shops. The trick seems to be getting one that doesn’t cause too much interference and . What you typically get is a small box that has a cigarette lighter adapter coming out of one end and a standard plug socket on the other end. The first one I got cost me £40 and was rated at 300W. This let me do all the testing that I needed but every time I switched it on I got nasty noise lines on the TV screen and background audio noise. I was recommended that I run a clean power cable direct from the battery for this thing, and also make sure that its a decent thickness as whatever you are powering may draw a lot of current. A clean power cable gives you the option of using it for an amp if you ever want to add one at a later date anyway. The next inverter I tried was from Halfords at around 80 pounds. This one worked a treat but it was only rated at 150W and as I wanted to run a PC eventually I was concerned that it wouldn’t be up to the job so I took it back. I next ordered a 300W one from an electronics store that looked to be the same model as the Halfords one but again produced too much interference so again that went back. I then went into sextons again and asked them for one they use in their installations. It cost 80 quid and was the same make as the first one I got for 40 pounds but this one was only rated at 150W. It worked a treat. Maybe there is a difference between them but it is a coincidence that all the 300W models I tried produced too much interference. I would be interested to know if anyone else has found similar results. The PC that I wanted to eventually use only has a 145W power supply so I should be covered.
I cut the cigarette adapter off and connected it to the clean cable that I had run to the boot and made a new earth in the boot for it as well. I found a good spot for it and used Velcro to secure it into place in the boot. I haven’t hooked up a remote switch for it so I do have to go to the boot to switch it on before I power anything else up but it hasn’t caused me too many issues.
I’ve noticed recently these are now a hell of a lot easier to get hold of when I was first trying and seem to be offering a lot higher wattage ratings.
Sat Nav
The Head Unit does come with a SAT NAV option which would of been really nice but I think it was priced at around £1500 when I last looked. In the end I went for Tom Tom as I had had an early IPAQ that I didn’t really use any more.
I brought the software for it and a GPS mouse and I think it set me back about £300 in all which is a massive difference from the integrated solution. The integrated one would of been a lot neater but couldn’t justify the cost difference.
Tom Tom works really well. I’m currently running version 5 which is a massive improvement over version 3 and used it on a recent trip to Italy with the European maps as well and it did a great job.
Currently using Google Navigation on a Sony Z1
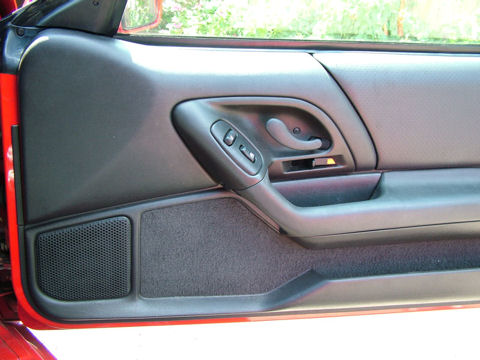
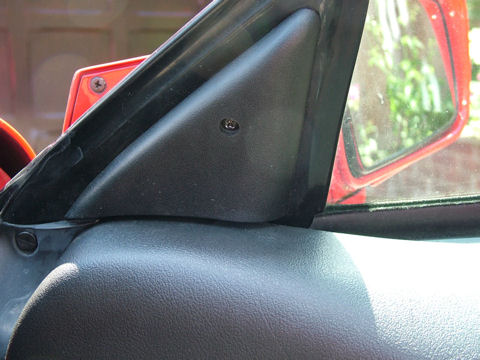
Door Speakers
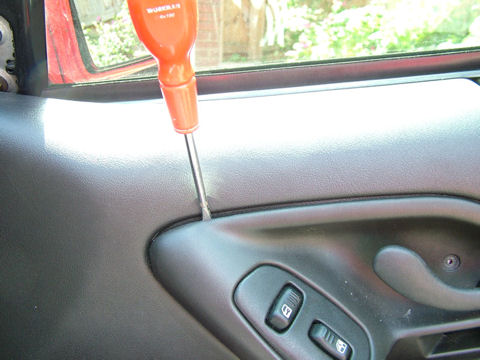
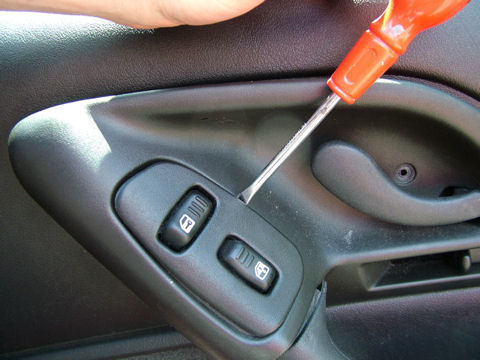
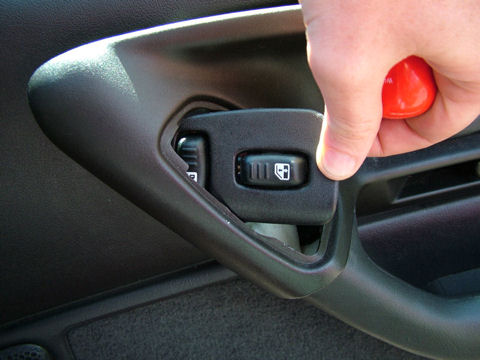
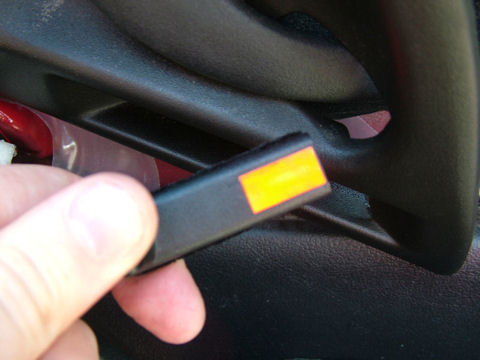
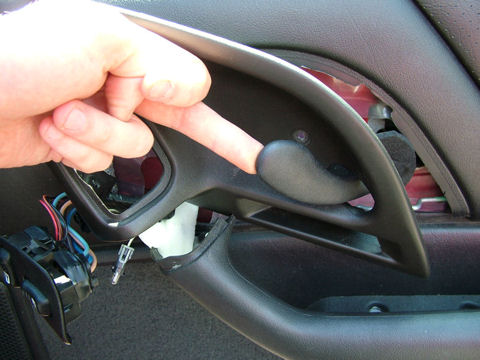
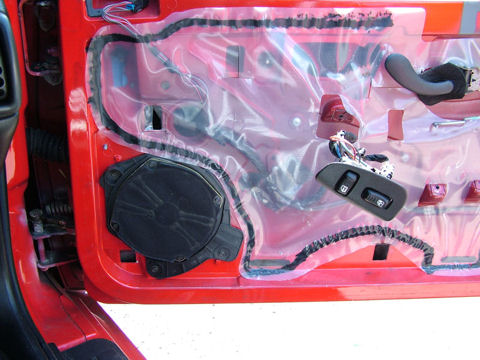
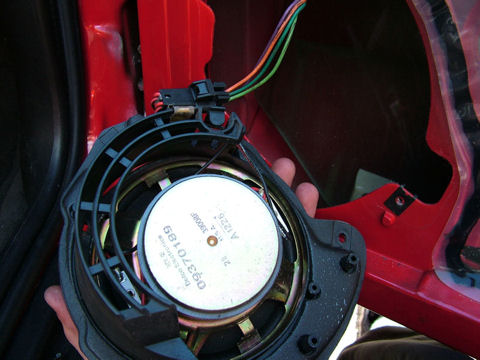
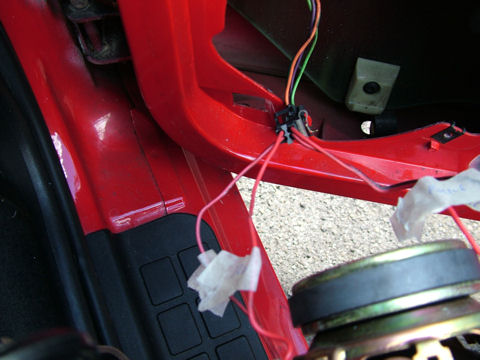
I blew one of the front speakers in my Camaro so set about replacing it and as usual things weren’t as easy as what I thought they were going to be.
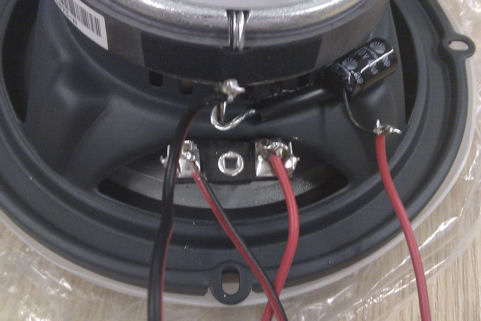
When I removed the door panel to have a look at the speaker I noticed it had four connecting wires instead of the usual two. After a bit of reading on the net I discovered that I had a monsoon system fitted and this speaker was an all in one component with separate inputs for the mid range and the tweeter. There was an amp in the boot that was splitting the signal and feeding the separate inputs on the speaker. This site was a great reference https://www.ls1tech.com/forums/stereo-electronics-19/
After quite a bit of searching around and a few phone calls it seemed that it was quite a bit of money to get a similar speaker to replace this one and a lot of the alternatives were no longer made.
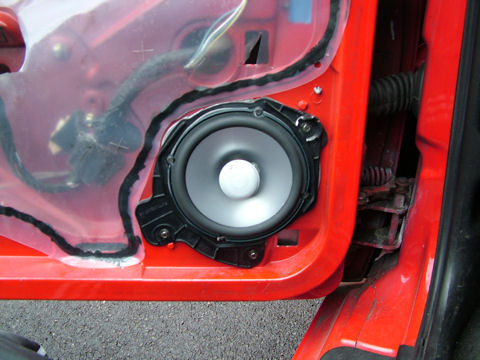
During a call to DVB Car Audio https://www.dvbcaraudio.co.uk/index.php trying to chase a speaker with four connectors they guy there suggested using a standard speaker and cutting the wires to the tweeter and soldering the wires direct to it. After some more searching on the net it seems that others had done the same thing so I went back to DVB Car Audio and ordered a pair of Infinity 6032I which were the latest versions of some speakers I had seen others had used in camaros and were meant to fit with no hassles.
No Responses